
Overview
Enabling the QuickBooks sync will allow you to keep your QuickBooks company file up to date with the latest changes performed in AdvancePro, eliminating the need for double-entry. If you are setting up a new AdvancePro company and have existing data in QuickBooks, you can also perform a one-time import of customers, vendors and products from QuickBooks.
With the exception of the initial import and payment status on invoices, the sync is one-way from AdvancePro to QuickBooks. All new transactions, inventory adjustments, and changes to customers, vendors and products must be performed directly in AdvancePro. The changes will be reflected in QuickBooks after syncing.
Information that syncs from AdvancePro to QuickBooks (when records are created or updated):
- Customers
- Vendors
- Products
- Transactions (bills, invoices, credit memos)
- Inventory adjustments
- Work orders
- Currencies
- Payment terms
- Payment methods
- Taxes
- Carriers (shipping methods)
- Changes to accounts and sub-item settings for products
Information that syncs from QuickBooks to AdvancePro (one time only):
- Customers
- Vendors
- Products
- Assembly items
- Sales reps
- Shipping methods
- Payment terms
- Payment methods
- Currencies
Information that does NOT sync from QuickBooks to AdvancePro:
- Transactions
- Price levels
- Account settings for products
- Advanced Inventory details (serial numbers, sites, etc.)
- Other details not applicable to AdvancePro
Note: most details that do not automatically sync from QuickBooks can be imported via spreadsheet.
Back up QuickBooks and AdvancePro BEFORE proceeding
It is recommended that separate copies of your QuickBooks and AdvancePro companies are created for testing. This will allow you to configure and test the integration without affecting any live data. If you are enabling the sync for the first time on live company files, backup your AdvancePro and QuickBooks company files before proceeding.
Do you use QuickBooks Enterprise with Advanced Inventory?
If you are using QuickBooks Enterprise, disable any Advanced Inventory settings - particularly the following:
- Inventory Sites
- If enabled, it may cause adjustments to miscalculate when exporting to QuickBooks or transactions to fail to export.
- Enhanced Inventory Receiving
- If enabled, item receipts will need to be manually created in QuickBooks after bills export from AdvancePro.
- You must create a new company file or use a 3rd party service to disable this setting.
Configuring Initial QuickBooks Export Options
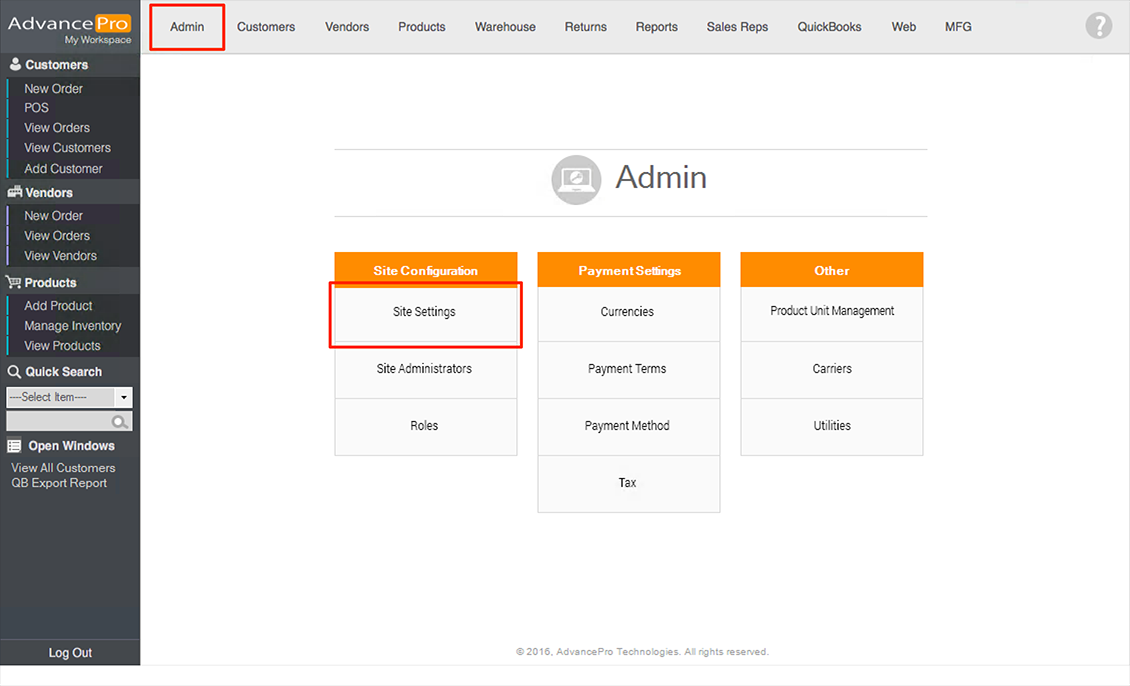
1. Go to ‘Admin' > 'Site Settings’:
2. Click on the ‘QuickBooks’ tab and ensure the following options are configured:
- Enable the “Are you a QuickBooks user” option, if it is not already enabled.
- Ensure the correct type and version are selected on the right side.
IMPORTANT: You cannot change the type or version of QuickBooks after saving the initial selection. You will be prompted to clear the AdvancePro database if you change either setting afterwards!
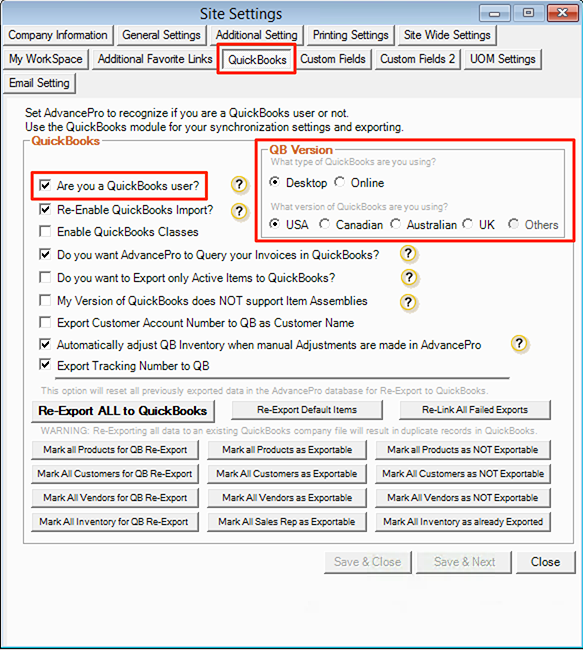
3. Configure the remaining options as desired:
- Re-Enable QuickBooks Import - This allows users to import new records from QuickBooks. Once you have completed the initial import, disable this setting to ensure no one accidentally performs another import (which could result in duplicate records).
- Enable QuickBooks Classes - This allows you to import your class list from QuickBooks and assign those classes to invoices and bills in AdvancePro. When the transactions export to QuickBooks, they will be assigned to the those classes.
- Do you want AdvancePro to Query your Invoices in QuickBooks? - This allows payment status from QuickBooks to sync back to AdvancePro. Once an invoice has been paid in full in QuickBooks, and a sync has been performed, the paid status will show on the invoice when viewed in AdvancePro.
- Do you want to Export only Active Items to QuickBooks? - This prevents products from exporting to QuickBooks until they have been used on a transaction. (It is advisable to leave disabled in most cases.)
- My Version of QuickBooks does NOT support Item Assemblies - This causes item kits in AdvancePro to export to QuickBooks as non-inventory items. Enable this option if you are using QuickBooks Pro or an older version that does not support assembly items.
- Export Customer Account Number to QuickBooks as Customer Name - This will remap the account number field in AdvancePro to the customer name in QuickBooks. Leave disabled unless you require this behaviour.
- Automatically adjust QuickBooks Inventory when manual Adjustments are made in AdvancePro - This controls how on-hand quantities for products are updated in QuickBooks.
When this setting is enabled (the recommended option), inventory adjustments made in AdvancePro will trigger a stock comparison for that item based on what is expected in QuickBooks. For example, a product starts with 1000 on hand, 500 are received (but the bill is not yet created) and then a -100 adjustment is performed (bringing AdvancePro on hand to 1400). During the next export to QuickBooks, AdvancePro will calculate that QuickBooks should have 900 on hand after the adjustment (since the bill is still in a pending state and will later add 500 to QuickBooks inventory once it is created and exported). The appropriate positive or negative adjustment will be performed in order to bring QuickBooks on hand to 900.
When this setting is disabled, no stock comparison calculation will be performed. Instead, each individual adjustment performed in AdvancePro will export to QuickBooks (but only once ALL bills/invoices containing the product are created). If there is any discrepancy between AdvancePro and QuickBooks on hand quantities, this discrepancy will remain until manually corrected in QuickBooks. Disabling this option is not recommended for anyone that needs to leave invoices or bills in a pending state for an extended period of time, as it can result in adjustments being prevented from exporting.
One advantage, however, of disabling this settings is that it does allow for specifying different adjustment accounts for each adjustment that is performed (when using the "Multiple Adjustments" feature). If this is a requirement, you may want to consider doing this. - Export Tracking Number to QuickBooks - This allows tracking numbers entered in AdvancePro to export to QuickBooks (the tracking number will show as the last line item on the invoice).
Selecting the QuickBooks Company File to Sync With
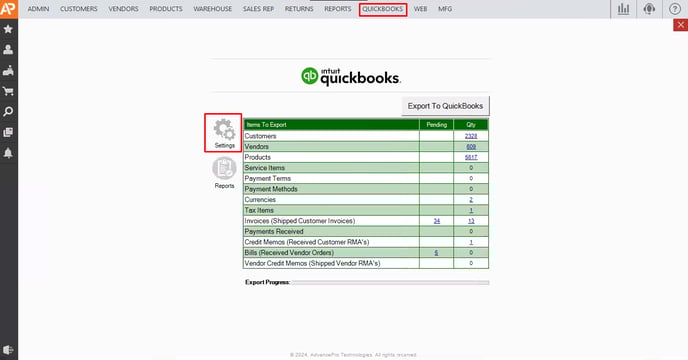
1. Go to ‘QuickBooks' > ‘Settings':
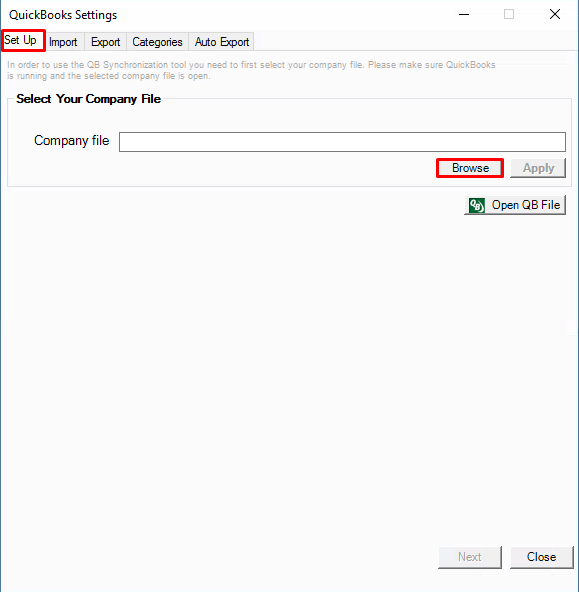
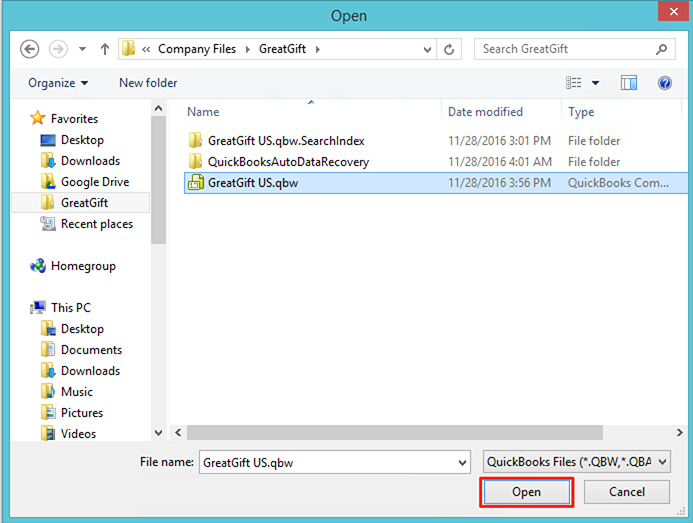
2. On the ‘Set Up’ tab, click ‘Browse'
 f
f3. Navigate to the QuickBooks company file, select it and click ‘Open’
Note: the default company file location is C:\Users\Public\Public Documents\Intuit\QuickBooks\Company Files\.
Note: the default company file location is C:\Users\Public\Public Documents\Intuit\QuickBooks\Company Files\.
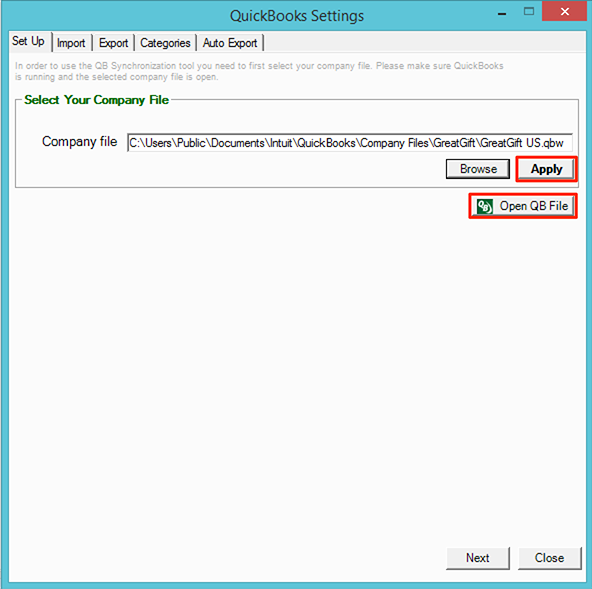
4. Temporarily close the QuickBooks company file if it is currently open, then click ‘Apply’ and ‘Open QuickBooks File'
Importing from QuickBooks
IMPORTANT: Skip this step if you already have data in AdvancePro. This is only for setting up a NEW AdvancePro company file. If your data has already been imported or manually entered, this will result in duplicate records!
1. Log into the QuickBooks company file as an admin user.
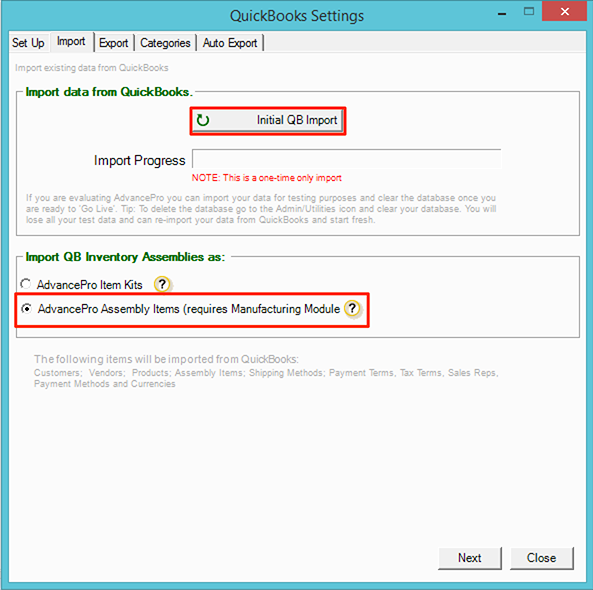
2. Go to the ‘Import’ tab and select the appropriate option in the “Import QuickBooks Inventory Assemblies as” section:
- Select "AdvancePro Item Kits” if you are not using the Manufacturing module.
- Select "AdvancePro Assembly Items” if you are using the Manufacturing module and have assemblies to import.
3. Click the ‘Initial QuickBooks Import’ button once ready to start the import.
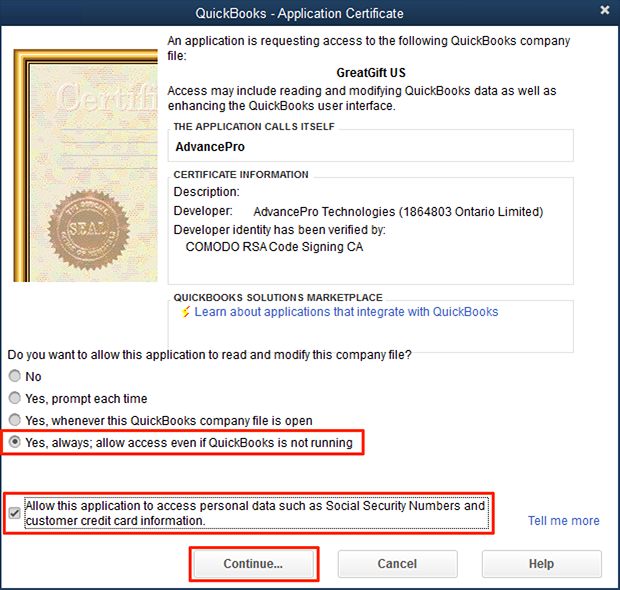
4. If the following prompt is displayed in QuickBooks, select the level of access you wish to grant and then click ‘Continue’ and ‘Done’ on the next window.
Note: If you have multiple users and are granting access even when QuickBooks is not running, there will be a drop-down to select a user. Be sure to select an admin user as other users will not have sufficient privileges for various types of exports.
Note: If you have multiple users and are granting access even when QuickBooks is not running, there will be a drop-down to select a user. Be sure to select an admin user as other users will not have sufficient privileges for various types of exports.
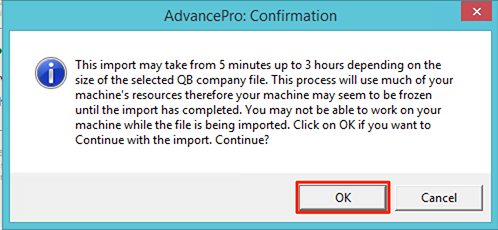
5. Click ‘OK’ on the AdvancePro Confirmation pop-up window.
6. If you are NOT importing assembly items, the import process will finish after a short period of time (depending how many items are being imported) and you will see a message confirming that all items have imported.
Importing Assembly Items
If you are importing assembly items, you will need to repeat the import process after it finishes. This is because components of assemblies need to import before the assembly items. In cases where there are sub-assemblies, it may be necessary to repeat the import process two or more times for all levels of assembly items to import.
1. To repeat the import process, go back to the ‘Import’ tab, select the ‘AdvancePro Assembly Items’ option and then click the ‘Initial QuickBooks Import’ again.
2. After the next import finishes, you may see the following message:
3. Click ‘OK’ to view which assembly items have not yet imported and then repeat the import process until you no longer receive the ‘Assembly import failed’ message. At this point all assemblies will have imported.
Configuring Product Account Settings
Before exporting to QuickBooks for the first time, it is necessary to configure the default accounts that will be debited/credited when exporting transactions and adjustments to QuickBooks.
The asset, income and COGS accounts for products will be updated in QuickBooks during the export to match the accounts specified in AdvancePro. If you need to specify different accounts for specific types of products, you can create category specific overrides which will be discussed in the next section.
To set the default account settings:
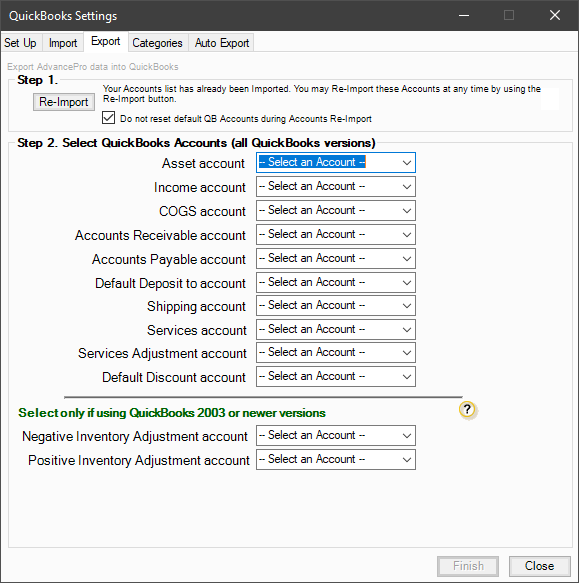
1. Click on the ‘Export’ tab of the QuickBooks Settings window.
2. Select the appropriate account from each drop-down and click ‘Finish’ to save the changes.
Explanation of Account Settings:
- Asset Account - This is the inventory asset account that will be debited or credited by changes to inventory.
- Income Account - This will be credited when invoices export to QuickBooks.
- COGS Account - This will be debited when invoices export to QuickBooks.
- Accounts Receivable Account - This will be debited when invoices export to QuickBooks.
- Accounts Payable Account - This will be credited when bills export to QuickBooks.
- Default Deposit to Account - This specifies the default option when receiving payments in AdvancePro and can be overridden. It should be an ‘Other Current Asset’ or ‘Bank’ account type.
- Shipping Account -This is the account that will be used for shipping income on invoices.
- Billing Shipping Account
- Services Account - This corresponds to the 'expense account' field for service items in QuickBooks. This account will be debited/credited when service items are used on bills or invoices.
- Services Adjustment Account - This is a clearing account used for tracking freight costs on bills. This is applicable if you are using the freight module for tracking landed costs.
- Default Discount Account - This specifies the default account that will be used for promotion codes (which can be overridden). Each promotion code created in AdvancePro will create a corresponding discount item in QuickBooks that will appear on invoices. The account can either be an expense or income (contra-income) account.
- Negative/Positive Inventory Adjustment accounts - These are used for tracking adjustments to inventory and MUST NOT be the same as the asset account (they offset the adjustments to the asset account). Typically these would be expense, income or COGS accounts and may be separate accounts or a single account for tracking both negative and positive adjustments.
Setting Accounts for Specific Product Categories
If you use different accounts for different types of items in QuickBooks, you can set category specific overrides in AdvancePro. For each category, you can specify an Asset, Income, COGS and Expense account that will override the default account settings. If all your products are assigned to the same accounts in QuickBooks, you can skip this step.
If you have not already done so, you will need to create the categories and assign the products to those categories as necessary.
To set the category specific account settings:
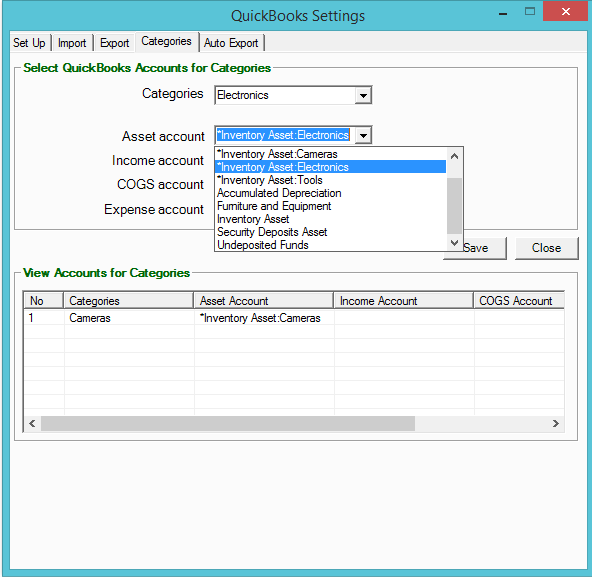
1. Go to ‘QuickBooks’ > ‘Settings’ > ‘Categories’ tab.
2. Select a category from the ‘Categories’ drop-down and then select any accounts from the options below that you want to override the default settings.
3. Once one or more accounts have been selected, click ‘Save.’ (For any you do not specify, the default accounts will be used.)
4. Repeat steps 2-3 for any other categories that require unique account settings.
Manually Exporting to QuickBooks
IMPORTANT: backup your QuickBooks and AdvancePro company files prior to your first export. If any items or settings in AdvancePro are different than QuickBooks, then the corresponding items and settings will be updated in QuickBooks during the export. Backing up will allow you to roll back if you have made a mistake on the setup and need to reconfigure.
To manually export to QuickBooks:
1. For the first export, ensure that you are logged into the company file in QuickBooks that AdvancePro is configured to export to (and only that file) as an admin user.
2 Go to the ‘QuickBooks’ tab and click 'Export to QuickBooks.'
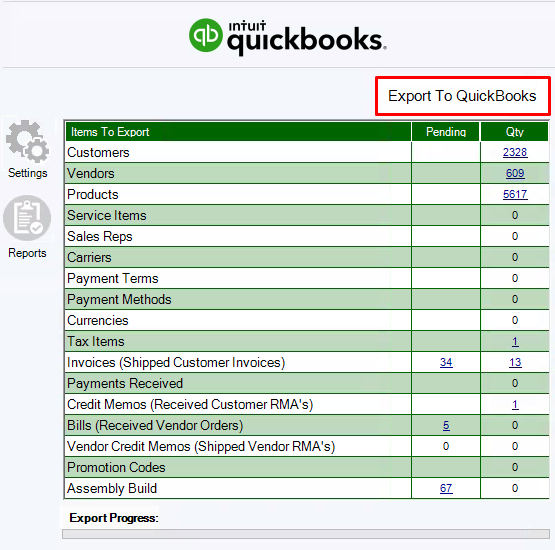
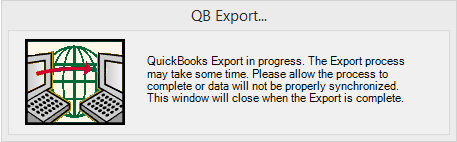
3. The below pop-up message will be displayed during the export and the "Export Progress" bar will indicate the current progress.
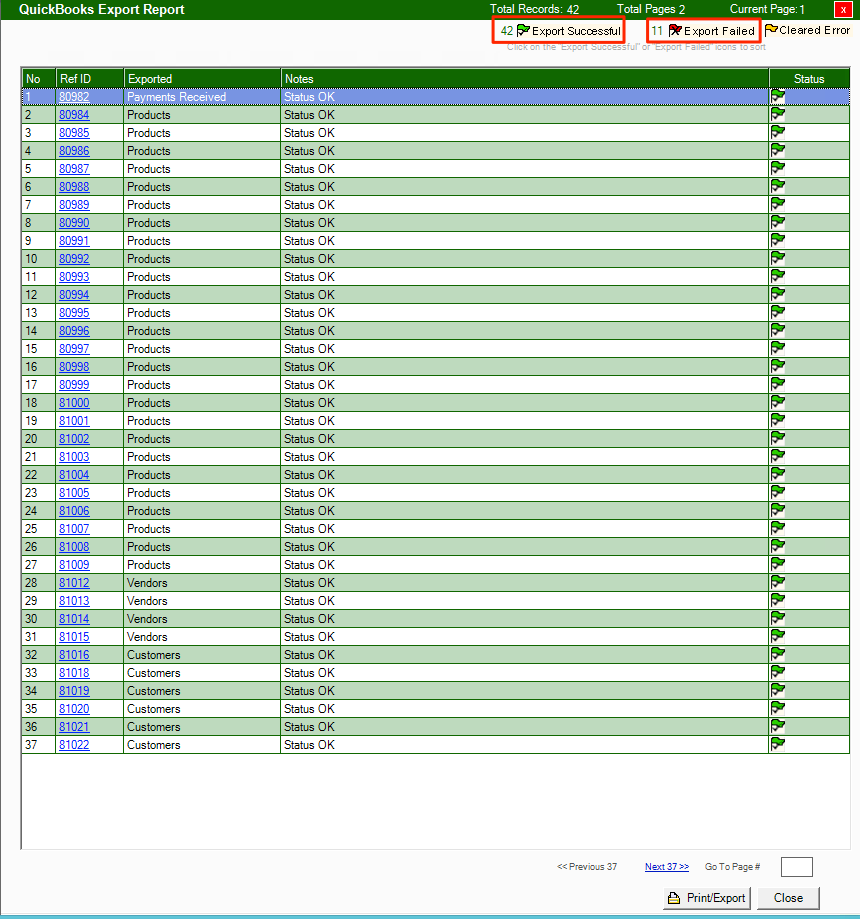
4. When the export has finished, you will see a report of all successfully exported items, as well as any failed items. You can filter the list by clicking on "Export Successful" or "Export Failed" at the top-right.
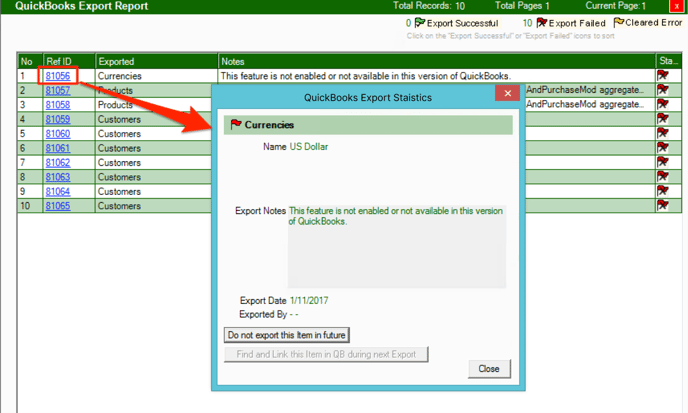
5. If there are any items that failed to export, you can click the blue "REF ID" number for each line to see more details of the problem. Resolve those issues as necessary and repeat the export process until there are no more failed items shown.
Note: you can continue exporting to QuickBooks any time you want to sync the latest updates and transactions. You will need to be logged into the QuickBooks company file unless you selected the option to allow access to the company file when QuickBooks is not running. If you have multiple company files, you will need to close out of any other files before exporting (or the export may fail).
Automatically Exporting to QuickBooks
It is generally recommended to manually export to QuickBooks as this gives you the greatest control over the process. However, you can also configure AdvancePro to export to QuickBooks at set intervals by following the below steps:
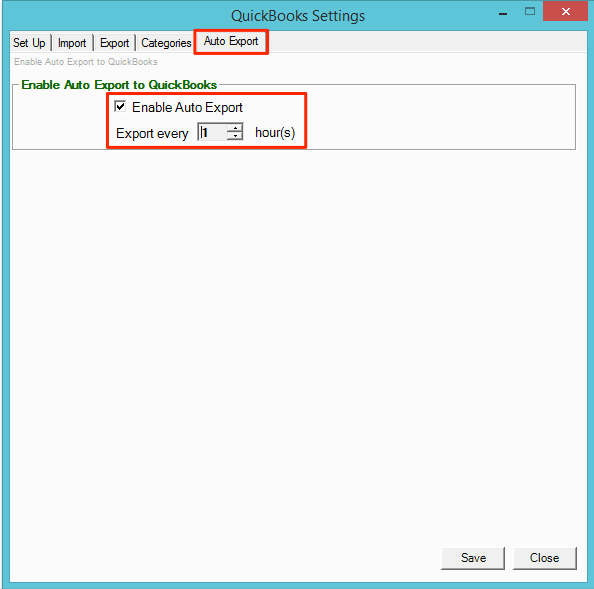
1. Go to ‘QuickBooks' > ‘Settings' > 'Auto Export'
2. Check the 'Enable Auto Export' option and select how often you want the export to be triggered (1 hour is the minimum interval).
3. Click 'Save' to apply the changes.
4. Restart AdvancePro to ensure the setting change has taken effect.
AdvancePro will trigger an export going forward at the set interval so long as you are logged into AdvancePro. If you did not select the option to allow access when QuickBooks isn't running during the initial setup, you will also need to be logged into the QuickBooks company file for the export to go through.
Note: it is recommended to review the QuickBooks Export Report daily so that you can make the necessary adjustments if any errors are shown. This will ensure everything continues to run smoothly.
DOWNLOAD: QuickBooks Syncing Setup Guide.pdf