This feature allows users to specify custom cut units on specially marked items during a sales order creation. This action will automatically calculate total length and price based on multiple price rules available.
Set-up
- To set-up this feature user needs to go to Admin > Product Unit Management and add the Unit/Length that is needed to create a conversion formula.
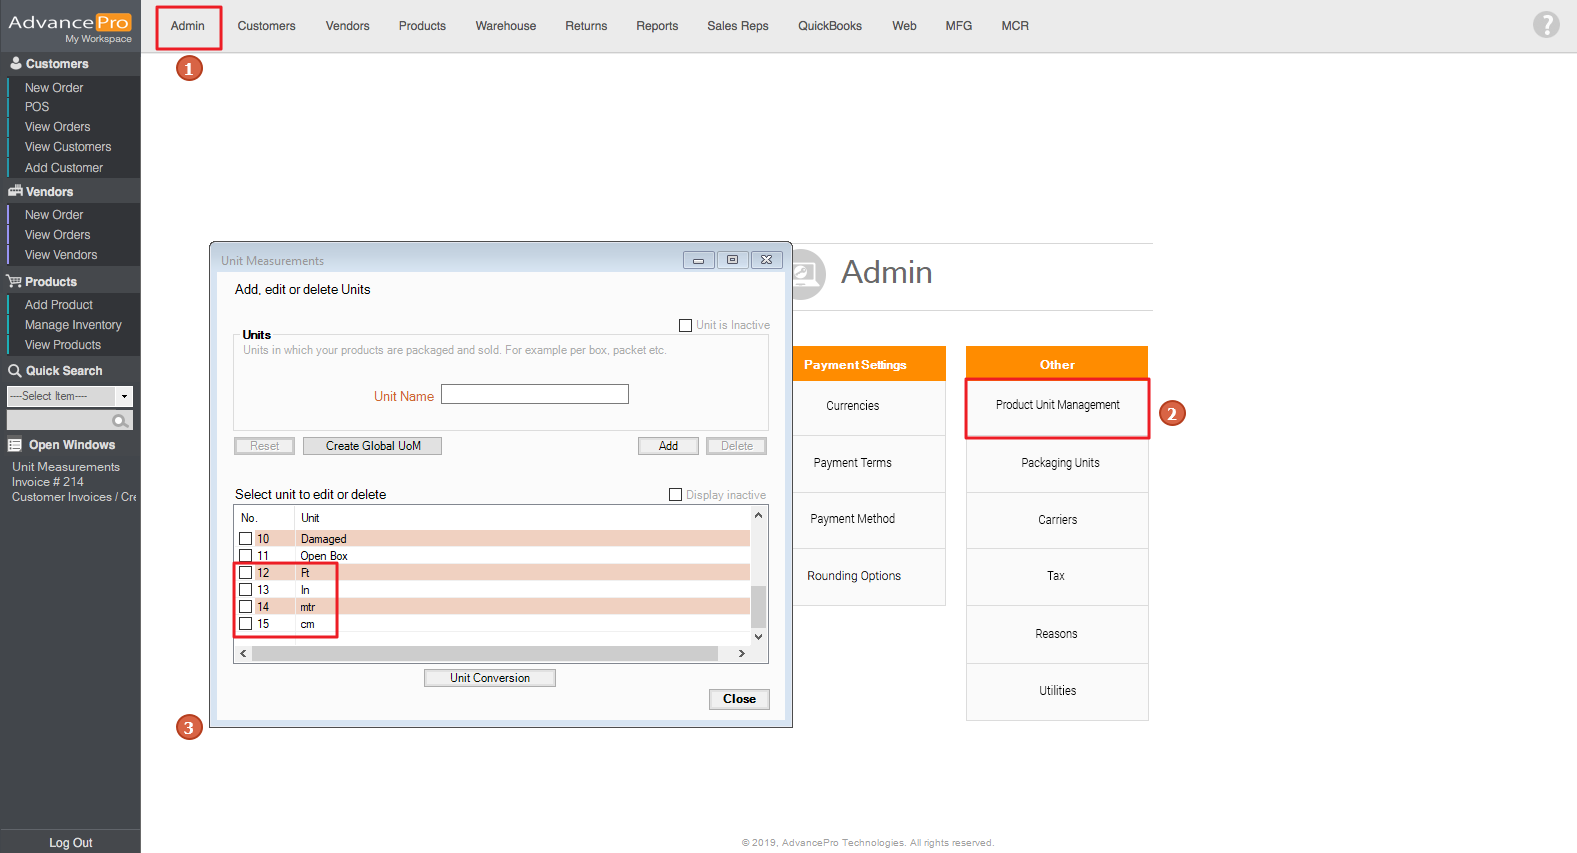
- Click on the Unit Conversion and create a conversion formula that later can be applied to products. For example, if you are working with inches and feet, you can create a conversion formula to convert inches to feet.
From Unit = "Inch" x "12" = 1 To Unit: "Ft"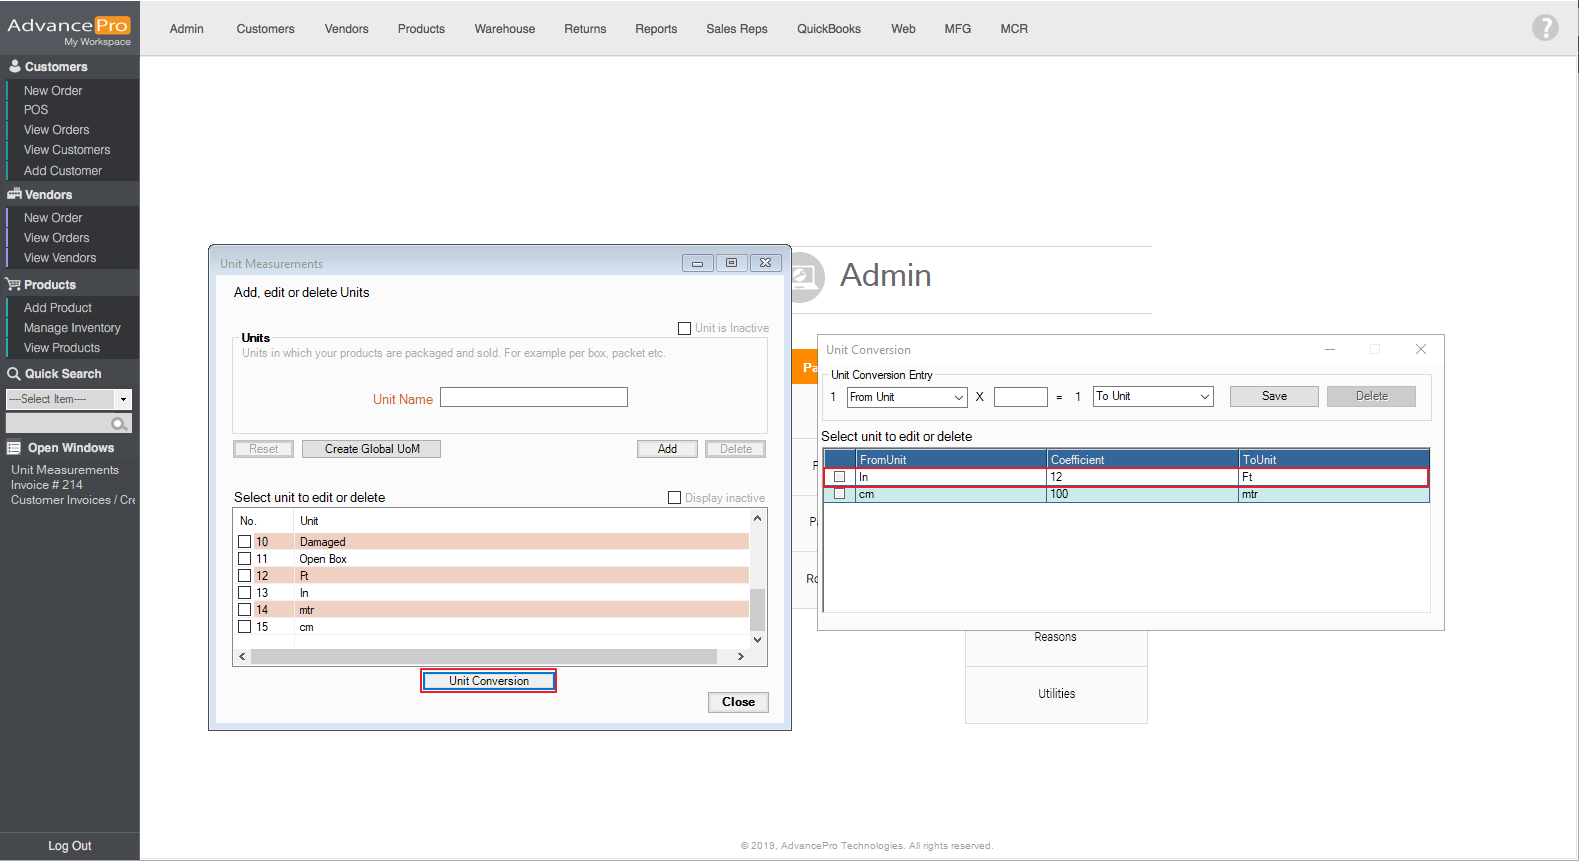
- Go to Products > Edit Products > click [E] > Additional Info, tick Enable and click Material Calculator button
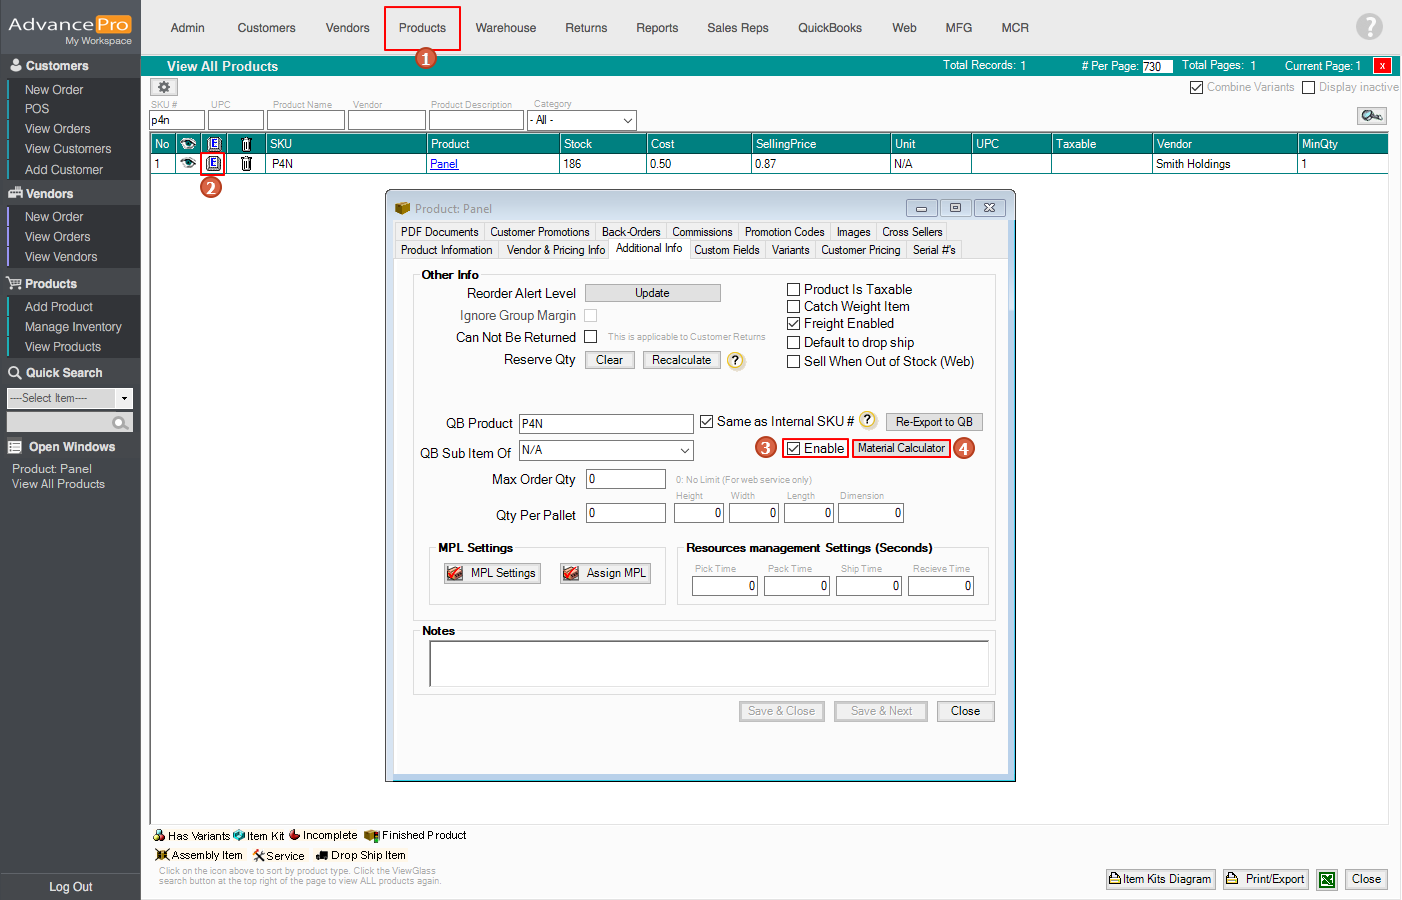
- Select a Unit Breakdown, Price Item By and Price will be calculated based on the Length or Cut selected on the Price Item By. For instance, if you selected "Ft", Selling Price will be multiplied by 12 and that will be the Price
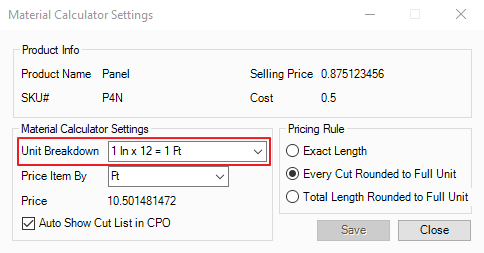
- Also, you need to enable Auto Show Cut List in CPO

- Selecting a Pricing Rule
- Exact Length - Pricing is based on the exact length
CLU Qty should be calculated as (Quantity * Larger unit) ft (Quantity * Small Unit) In - Every Cut Rounded to Full Unit - Pricing computation is based on the total length when the smaller unit will be counted as a larger unit
To calculate for CLU Qty first is to round up smaller unit into a larger unit and then for the formula (Quantity * Larger unit)
Note: The new selling price will be based on the proportion of the rounded length against the actual length. - Total Length Rounded to Full Unit - Pricing computation is based on the total length when the smaller unit is rounded up to a larger unit.
Get the exact length first which will be (Quantity * Larger Unit) ft (Quantity * Smaller Unit) In and then round up the smaller unit into a larger unit.
- Exact Length - Pricing is based on the exact length
How to compute for the CLU Price based on the selected Pricing Rule:
- Exact Length
- Every Cut Rounded to a Full Unit - For this pricing rule, please see example below
Quantity Larger Unit Smaller Unit 3 2 ft 4 in 1 4 ft 1 in 1. The first step is to calculate Total length and convert this to a smaller unit
a. 24 in (=2 ft) + 4 in = 28 in
b. 48 in (=4 ft) + 1 in = 49 in
Total Exact Length = (28 in)*(3 qty) + (49 in)*(1 qty) = 133 in.
2. As a result of applying "Every cut rounded" price rule, we will need to calculate "priced" length, For this, we will need to round each cut to a full(larger) unit:
a. 2 ft 4 in = 3 ft
b. 4 ft 1 in = 5 ft
3. Now that we rounded each cut to calculate the total "priced" length (convert to a smaller unit)
a. 36 in (=3 ft) = 36 in
b. 60 in (=5 ft) = 60 in
Total Priced Length = (36 in)*(3 qty) + (60 in) * (1 qty) = 168 in
4. As a result, we are able to calculate the new per-unit price that you will see on CPO:
Calc. Price = Selling Price * Exact Length / Total "Priced" length - Total Length Rounded to Full Unit
How it works
- Go to Admin > Site Settings > Additional Settings and enable these options:
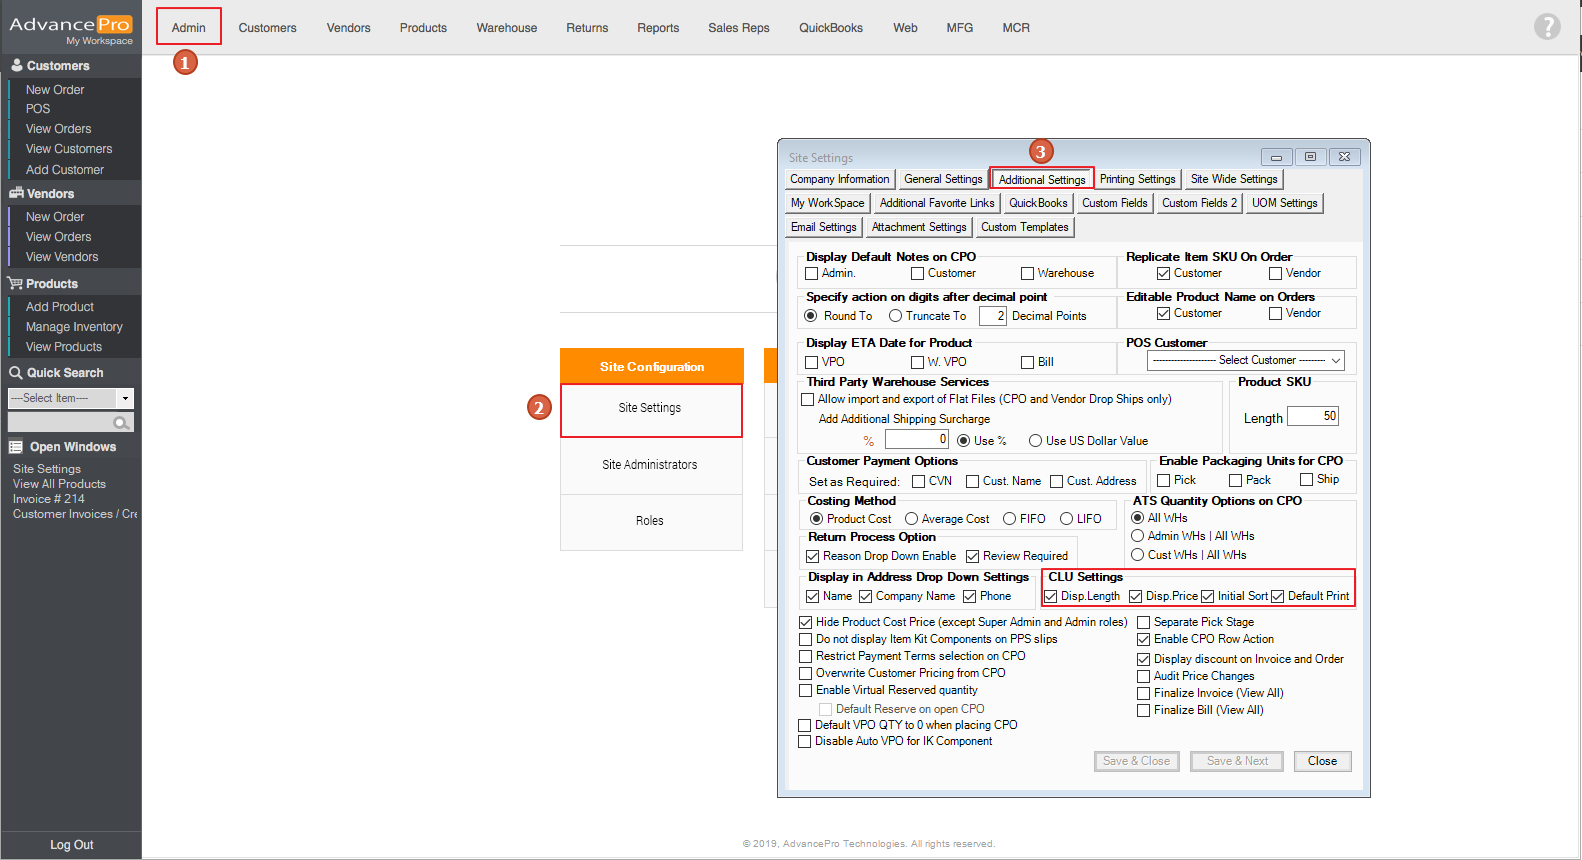
- Display CLU Length - When this option is enabled, CLU length will be shown on CPO and Warehouse tickets screens
- Display CLU Price - When this option is enabled, CLU Price will be shown on CPO screen
- Initial Sort - When this option is enabled, it will follow the sorting according to how the cuts have been added to the CPO screen. But when closing the Material Calculator form, cuts will be arranged from longest to shortest cut. This option can also be viewed on Warehouse tickets.
- Default Print
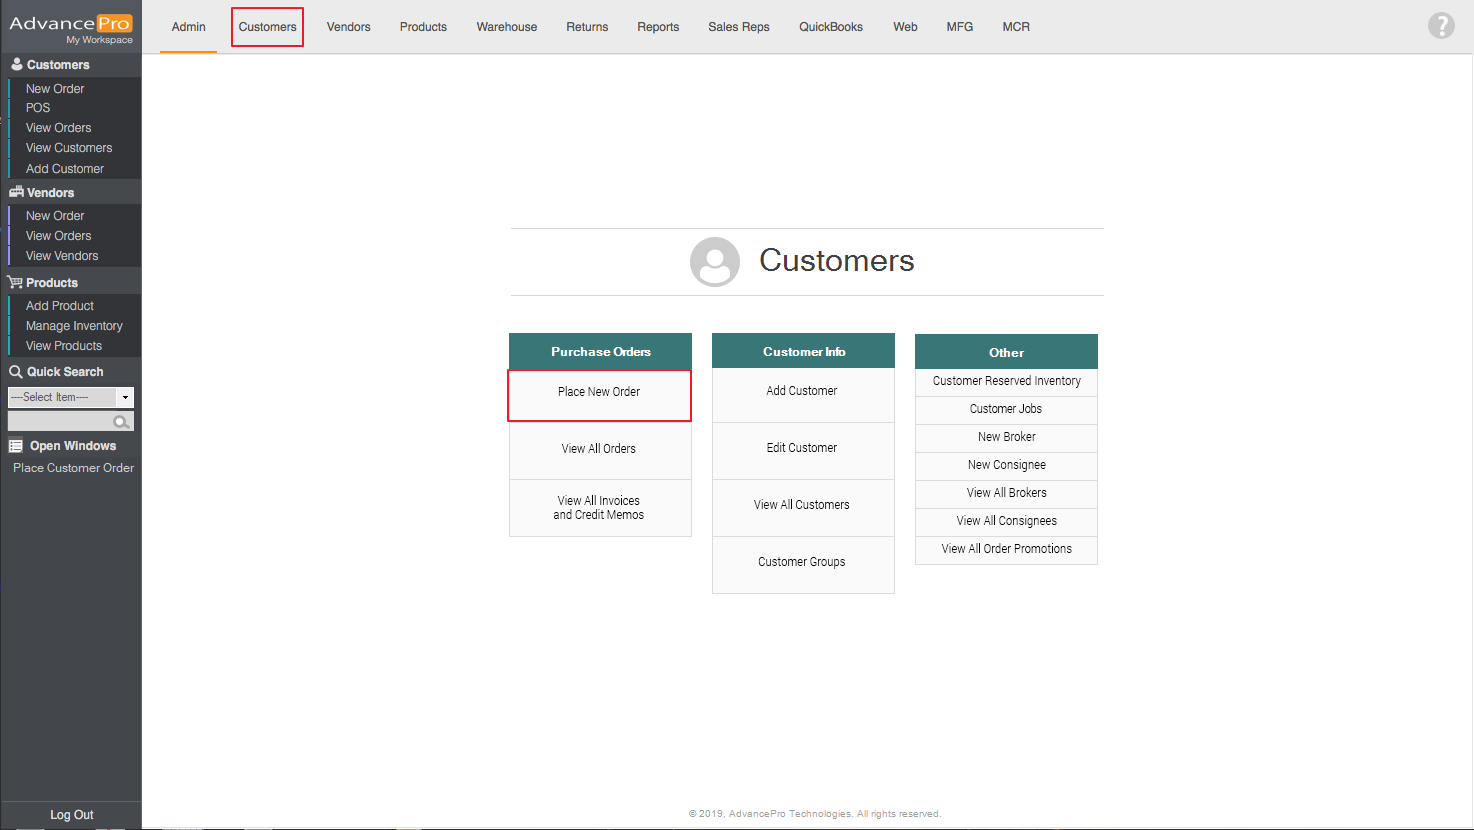
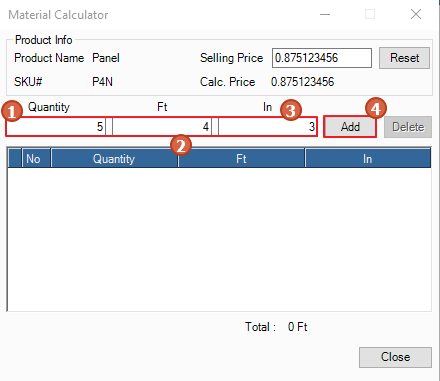
- To use the Material Calculator feature, go to Customers > Place New Order
- Click on the Product Selector, select a product that has Material Calculator enabled, and input quantity
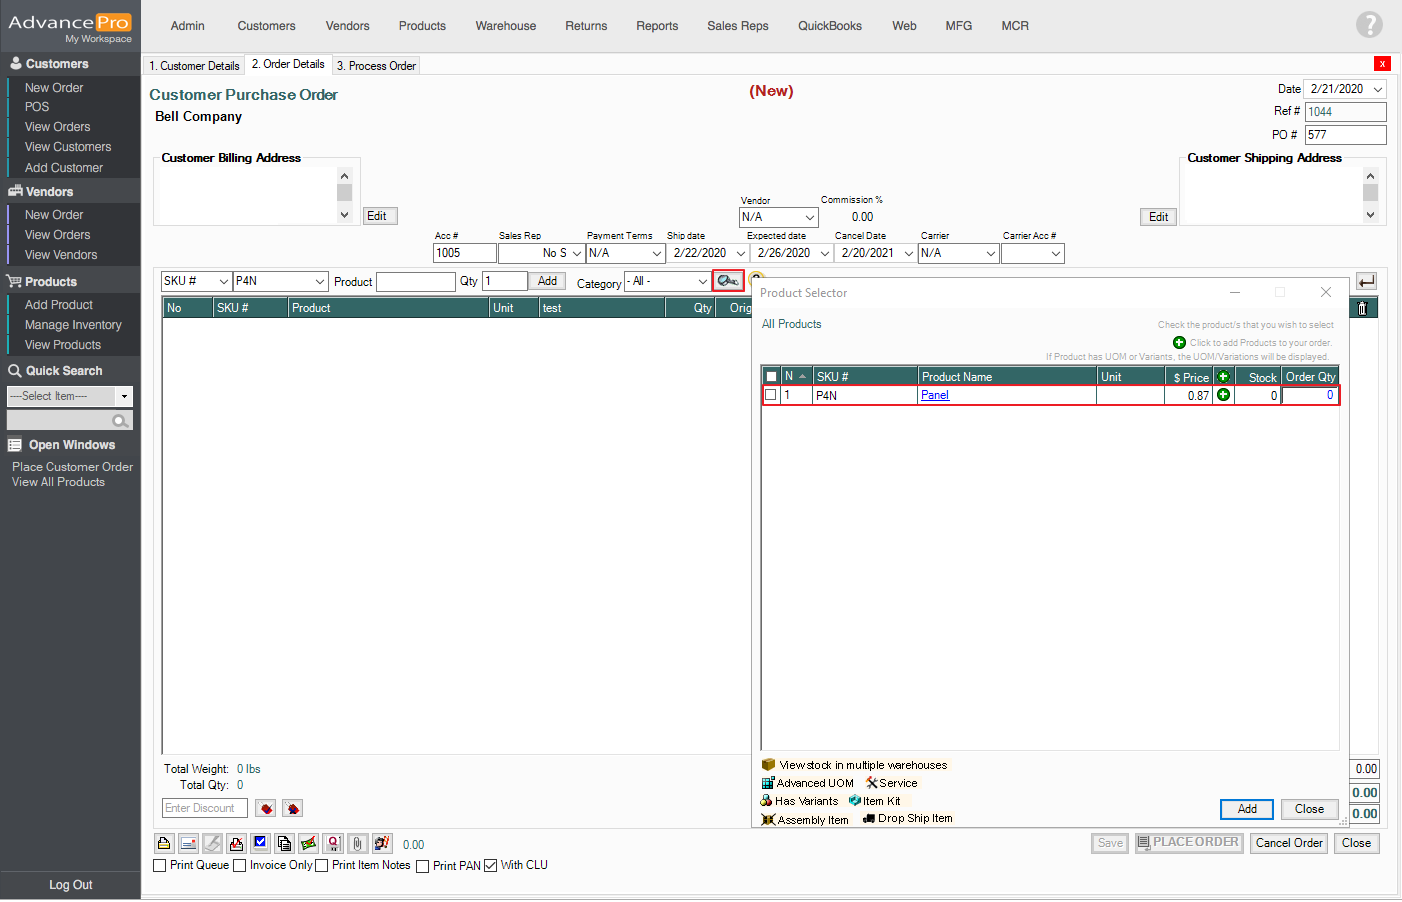
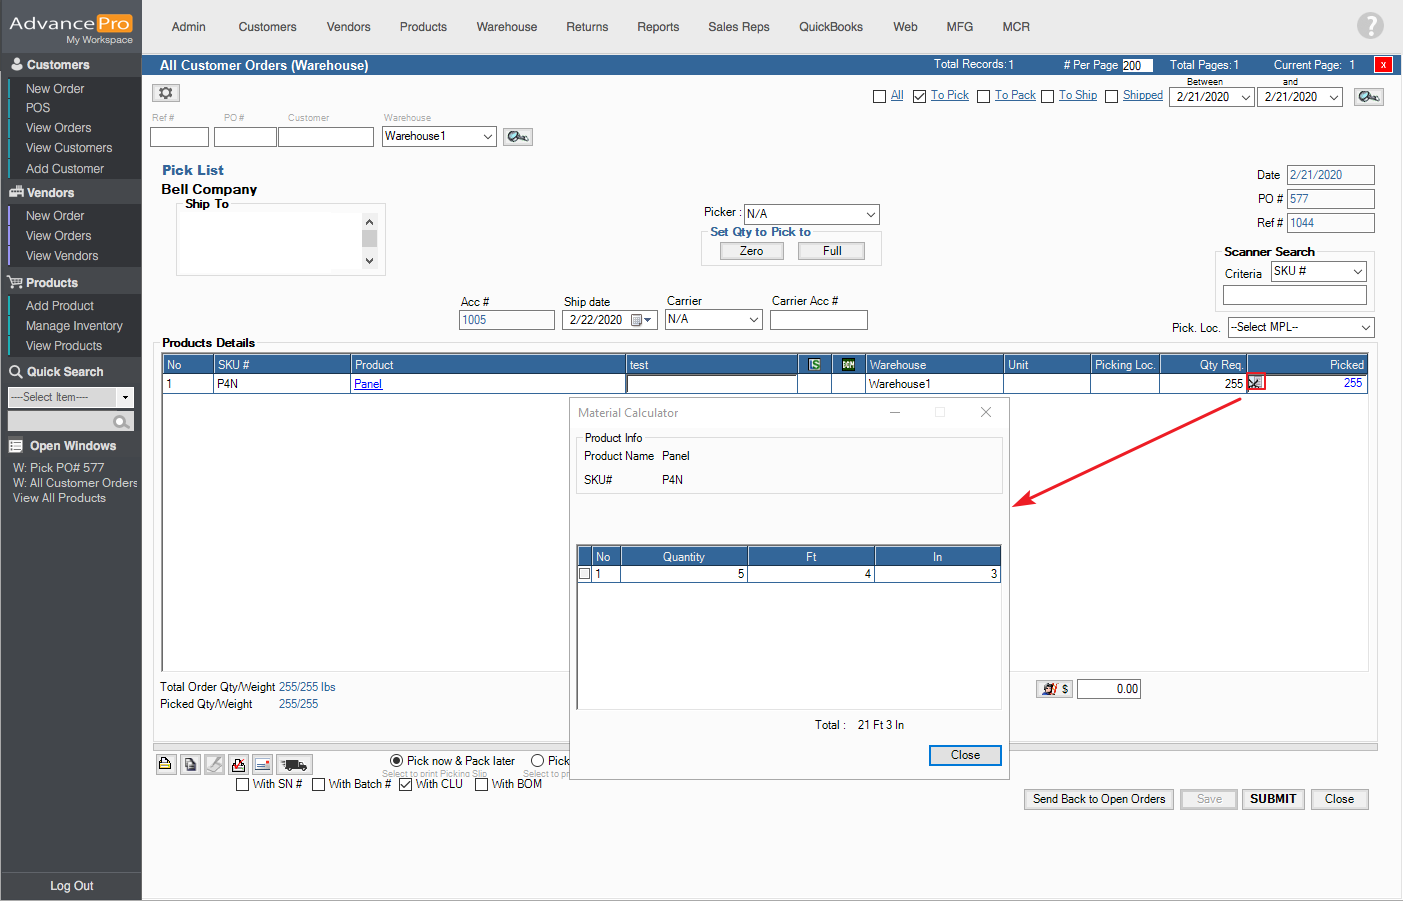
- Upon clicking on Add, another window will pop-up. Enter Quantity, Ft & In and click on Add
- You can also change the selling price on the pop-up window. The calc. price will be based on the selling price and the total length.
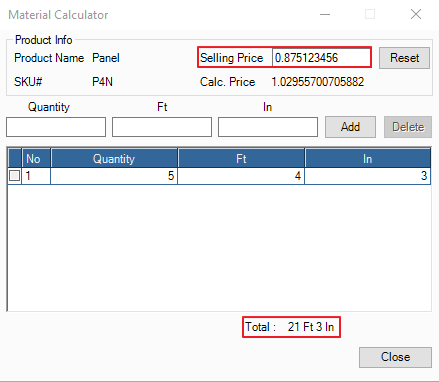
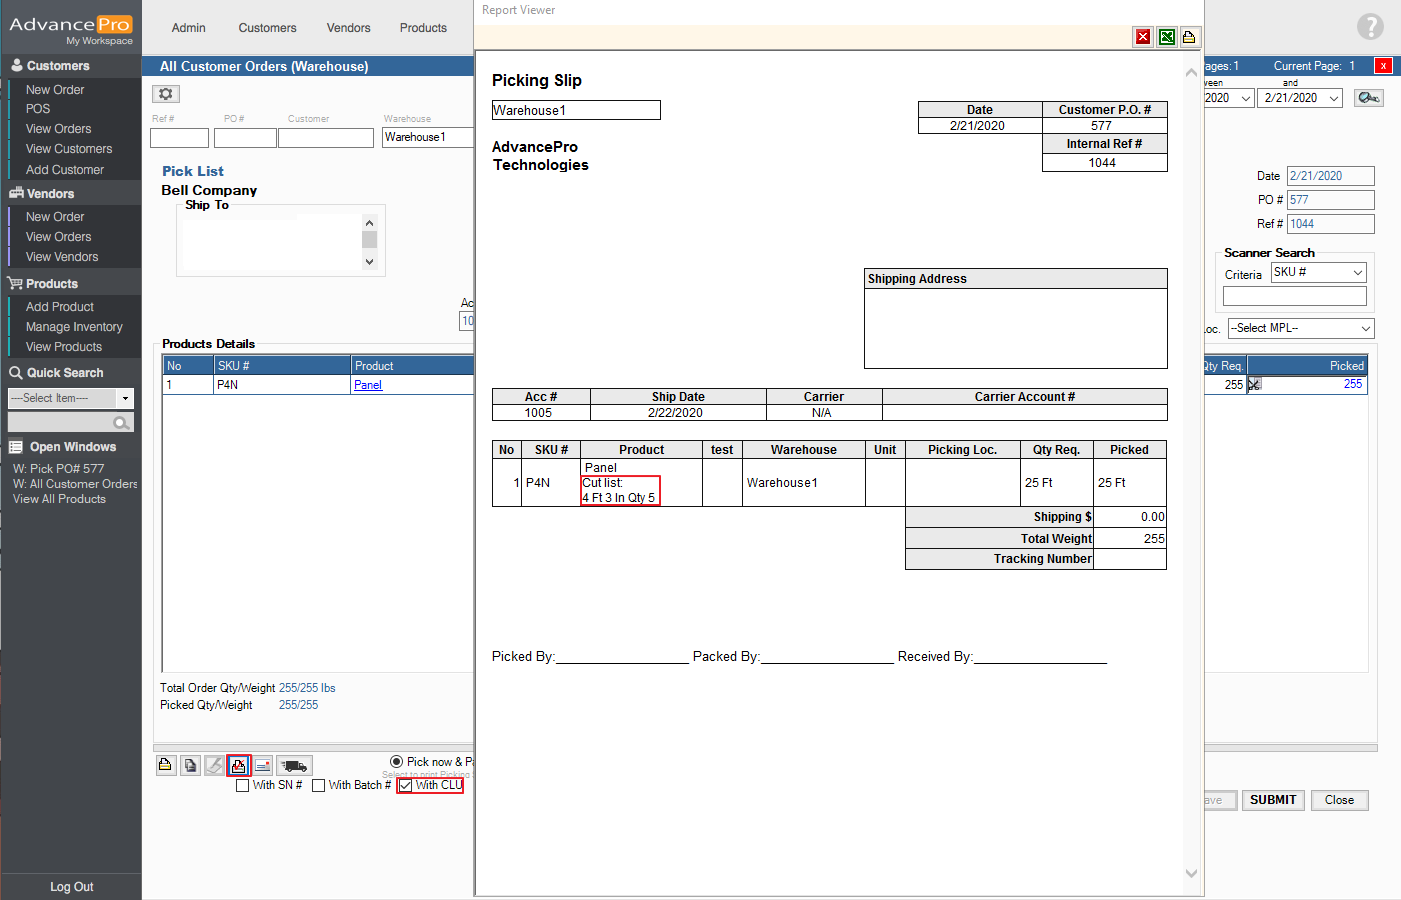
- Click on Close to add the cuts into the CPO. As seen on the screenshot below, two columns have been added to the CPO; CLU Qty and CLU Price.
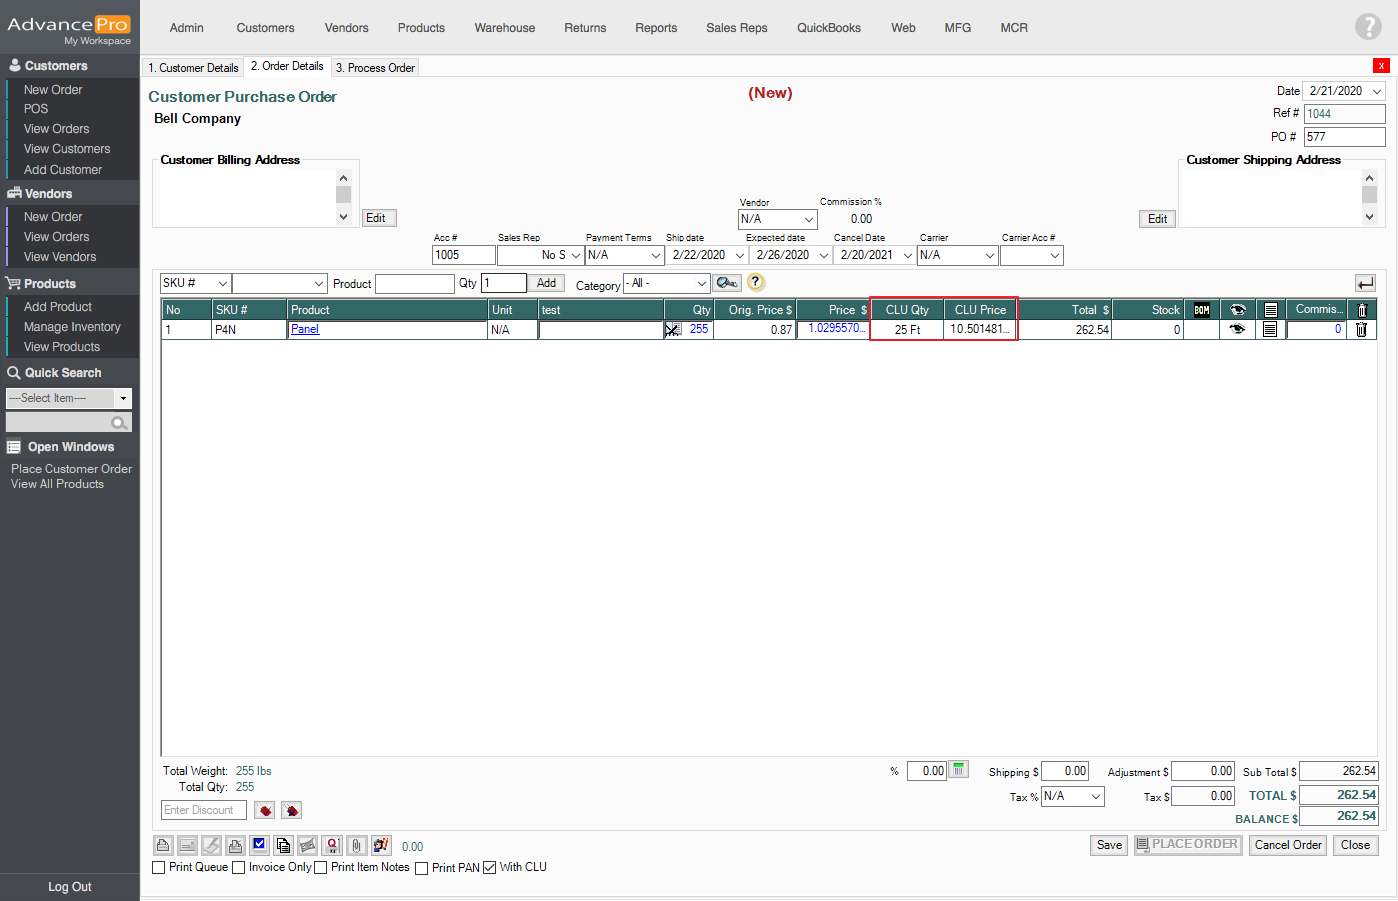
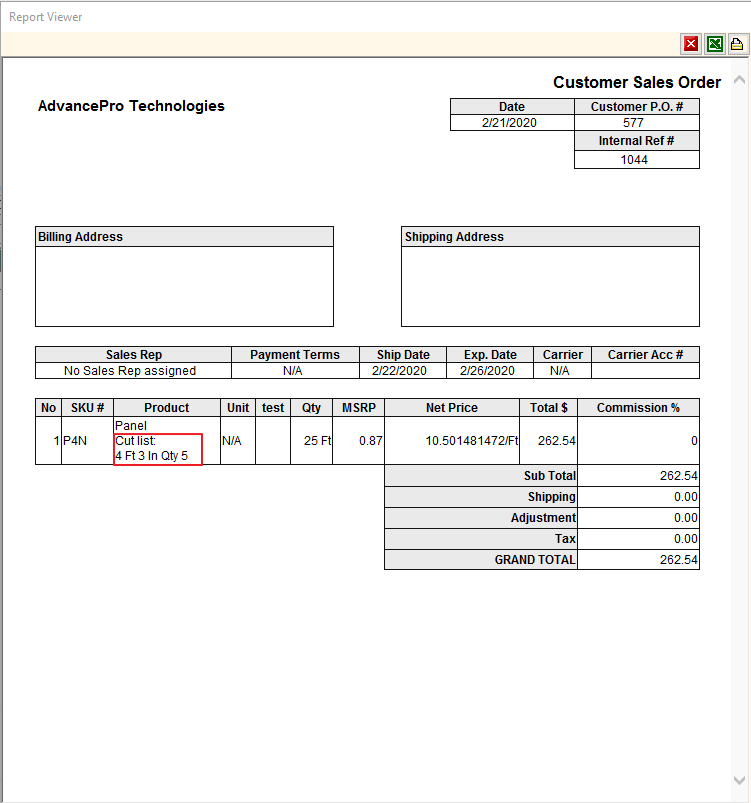
- You have also an option to print the CLU in the CPO. Just tick the With CLU and then click on SmartPrint. This can also be done on Warehouse tickets.
- When the order is in the warehouse, it is pre-picked and you cannot change the quantity. Before proceeding, information can be checked again by clicking on this icon

- Ticking the With CLU checkbox will allow the CLU to be shown in
Regular Print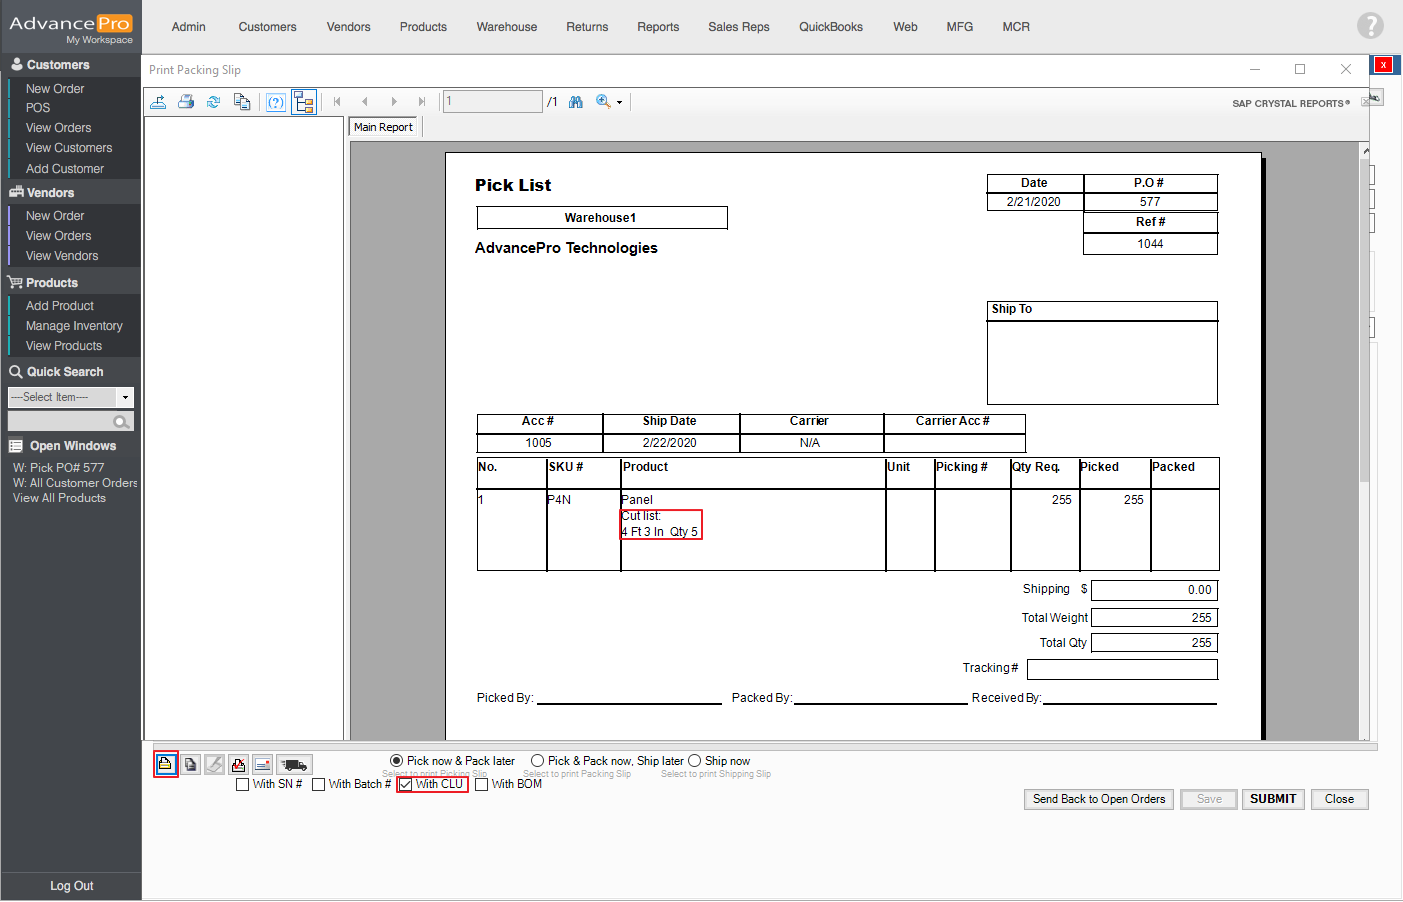
SmartPrint