
Item Kit Additional Info Tab
If you are returning to an item kit after having initially created the kit, from the Product Switchboard, click
Edit Product. Then, click the edit button to open the Item Kit form, and click the Additional Info tab.
At the Additional Info tab, you can enter information like the duty, any custom fields, whether to apply the
group’s margin, and other settings.
1 At the Additional Info tab, select whether to ignore any group margin settings. If you click this
checkbox, global margin settings will not apply to the kit.
Indicate if the item cannot be returned by clicking the checkbox.
2 Indicate if the kit should be entered into QuickBooks® as a non-inventory product by clicking the on-
Inventory checkbox.
If your version of QuickBooks does not support item assemblies, click this checkbox. If you do not
click this option and QuickBooks does not support assemblies, the item kit will export to QuickBooks as an Item
Assembly. You will also be required to “build” the item assemblies in QuickBooks once the invoice
exports from AdvancePro to QuickBooks
You can set this as a default option in the Admin>Site Settings > QuickBooks tab.
3 If there is a different QuickBooks product name, enter it in the field. Otherwise click the Same as
Internal SKU# checkbox.
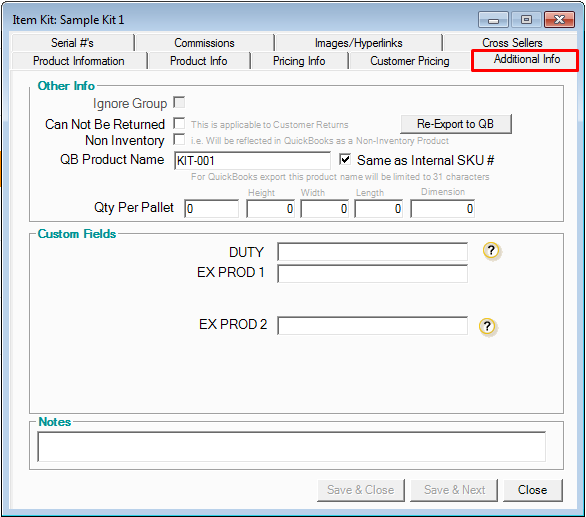
4 To re-export this kit to QuickBooks, click the button at the top right. This is not recommended.
5 You can specify the item kit dimensions or the maximum quantity per pallet for shipping. For more
information on creating and shipping pallets.
6 You can enter the duty on this kit. For information on the duty field and freight in general.
7 Fill out any custom fields your organization may require.
8 Enter any notes as necessary on this product.
9 Click Save & Close or Save & Next.
Attachments (ITEM KIT ADDITINAL INFO TAB.pdf)